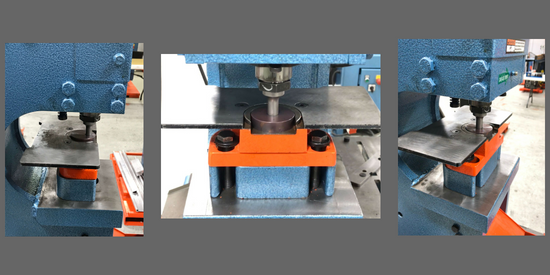
On a hydraulic ironworker, punching takes the place of drilling and is proven to be more efficient. Punching gives you the ability to produce holes of varying shapes and numerous sizes in a timely manner. In order for your ironworker punch station to be efficient in saving you time and money, the operator needs to know the proper ways to operate it.
One thing to remember is to NEVER punch material thicker than the diameter of your punch, doing so will increase the risk of your punch shattering and will put your operator in danger. This is just one thing to think about when using the punch.
How to Change a Punch and Die
%20(1).jpg?width=500&name=punch%20station%20acessories%20(1)%20(1).jpg) Standard Die - Jam Nut - Punch - Guard/Stripper
Standard Die - Jam Nut - Punch - Guard/Stripper
Proper alignment of your punch and die, each time, is crucial to your safety, those around you, and the integrity of your equipment. A punch and die set fits together like a glove, with a miniscule thirty thousandths of an inch (0.030”) clearance between the two. To put things into perspective, 0.030” is equivalent to the thickness of your driver's license. By attempting to align the punch into the die by jogging it down is a rookie mistake that will not end well. This will either ruin both the punch and die or injure the operator. It is also a good thing to double check that you are pairing up the correct punch with the correct die, each punch and die have their size engraved on them.
How to Properly Align a Punch and Standard Die
1. Run the beam all the way down and shut the machine off. All the alignment is done with no power to the machine.
2. Loosen the bolts on then die hold and pull the spacer back.
3. Slip the punch into the jam nut.
4. Thread the jam nut into the punch ram and tighten the jam nut firmly.
5. Place the die into the die holder. Make sure that milled spot on the die is aligned with the set screw on the die holder.
6. Using your hands, lift the die holder up to the punch and slide the spacer underneath.
7. Using an Allen wrench, tighten up the set screw. Doing this will make sure your die and die holder act as one unit and doesn't move.
8. Align the die to the punch, making sure you have equal clearance all the way around the punch.
9. Tighten die holder bolts.
10. Replace the guard and stripper.
11. Turn the machine on. Punch up and down with no material to make sure that you have the proper clearance between the punch and die.
12. Now your machine is ready for use.
How to Properly Align Punch with an Offset Die
1. Run the beam all the way down and shut the machine off. All the alignment is done with no power to the machine.
2. Loosen the bolts on then die hold and pull the spacer back.
3. Slip the punch into the jam nut.
4. Thread the jam nut into the punch ram and tighten the jam nut firmly.
5. Place the offset die into the die holder. Make sure that milled spot on the die is aligned with the set screw on the die holder.
6. Using your hands, lift the die holder up to the punch and slide the spacer underneath. (The punch never moves...just the offset die!)
7. Using an Allen wrench, tighten up the set screw. This is to make sure your die and die holder act as one unit and doesn't move.
8. Align the die to the punch, making sure that you have equal clearance all the way around the punch.
9. Tighten die holder bolts.
10. Replace the guard and stripper.
11. Turn the machine on. Punch up and down with no material to make sure that you have the proper clearance between the punch and die.
12. Now that your punch and die is properly aligned you're ready for business.
Tip: Lubricating the punch and die every 5-10 holes will make for smooth, cool punching! We use TAP MAGIC®!
Consider Getting Your Own Scotchman Ironworker »
When you go with Scotchman, you have our entire team at your disposal. Plus, we stock a full inventory of punch and die sets, offset dies, and tooling in-stock and ready for whatever needs arise.
Sometimes, a unique application requires a custom built solution.
If you need something beyond the standard tooling we offer, our team of engineers is equipped to design and build a tailored solution built to your specifications. From our plant in Philip, South Dakota, each step of this process from design and development to completion and testing is done in-house.
Do you have an application that requires the punching, shearing, forming, notching, or bending of a special part? Send us your custom tooling request here!



.jpg)
